
I appreciate your decision to start a blog in 2026. However, investing money is the main problem for beginners. No worries! Today I’m going to show you the cheapest way to start a blog that makes money.
I wrote this post after more than 36 hours of research. This post will help you to create a blog at a very low cost.
Along with that, I created a list of free tools and themes to reduce the cost. And I also shared my income reports and resources at the end of the post. Are you ready to go?
Okay, let’s dive into it.
Estimated Costs to Start a Blog
| Items | Price |
|---|---|
| Domain (.com) | $9.06 |
| Web Hosting (4 years) | $47.52 |
| Responsive WordPress Theme | $0.00 |
| Essential Plugins | $0.00 |
| Web & Content Creation Tools | $0.00 |
| Total: | $56.58 |
Key Steps to Starting a Blog in the Cheapest Way
- Choose a Profitable Niche
- Select a Perfect Domain Name
- Purchase a Domain & Hosting
- Install WordPress & Essential Setup
- Install a Responsive WordPress Theme
- Set up a Few Essential Plugins
- Content Creation Tools List
- Start Writing & Publish Your Content
- Add Your Site to Google
- Monetize Your Blog & Make Money
Cheapest Way to Start a Blog (step by step)
Follow these steps to start a successful blog that makes money. Okay, jump into the first step now.
Step 1. Choose a Profitable Niche
First thing first, you have to find and choose a profitable niche. In that case, you have to research on Google and forums to find a profitable niche. If you are wondering about the popular & evergreen niches, then check below.
- Weight Loss & Fitness
- Health (very competitive niche)
- Dating & Relationships
- Self-Improvement
- Create Custom Clothing
- Pets
- Finance
- Make Money Online
- Technology & Gadgets
So you can pick any of them or research more on the internet. After picking a niche, jump into the next step.
Step 2. Select a Perfect Domain Name
After getting a profitable niche, finding a perfect domain name is very important. Now it is super-easy to find a brandable domain name. How?
Okay, there are a bunch of domain name generators out there, but I personally like “Lean Domain Search.” It provides fantastic name ideas. Take a look below.
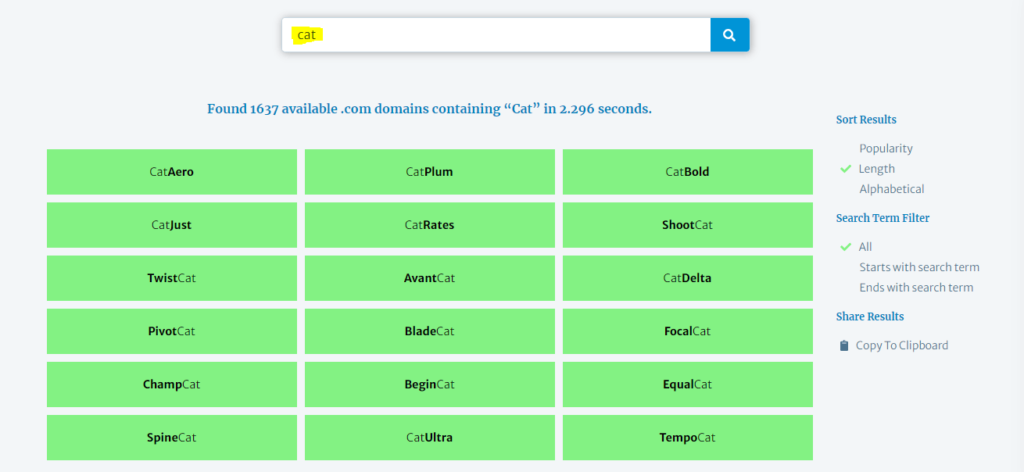
Try Lean Domain Search, and note a domain name you like. Okay, for now — jump into the next step.
Step 3. Purchase a Domain & Hosting
Okay, it’s shopping time!
Here I’m going to show you the cheapest and reliable sources to buy a domain and hosting. I’ve listed two different companies to reduce the cost. Even I recommend these companies, because of their extraordinary services.
Purchase a Domain:
When it comes to purchasing a domain, my first option is Namecheap. Yes, it is quite popular for its prices. Even the best thing is the renewal price. Most of the domain registrar companies offer a lower price for the 1st year, but their renewal price is very high. That’s why I like Namecheap. Also, you will get the domain privacy protection (WhoisGuard) is totally free for the lifetime.

If you would like to purchase a (.com) domain, then it costs $9.06 & the renewal price is $12.98 per year.
Okay, now it’s your turn. For now, purchase a domain that you researched before.
Occasionally Namecheap offers a bunch of discounts on their services. So don’t forget to check their current discount on the domain.
After purchasing your domain, you can jump into the next step. Are you ready? I heard you say “Yes” — just kidding.
Purchase a Hosting Plan:
Now, you need web storage for your blog. In that case, you have to purchase the best hosting service. Maybe you are wondering which company is the best & has the cheapest pricing plan, right?
No worries. I have a great solution for it!
Many people talk about Bluehost, but is it really fast and cheap? No, I don’t think so. Because most of the people talk about Bluehost only for high affiliate commission. But the most powerful and reliable hosting service provider is Dreamhost. Dreamhost is a powerful hosting company, also recommended by WordPress.
So what is the fastest and affordable hosting service?
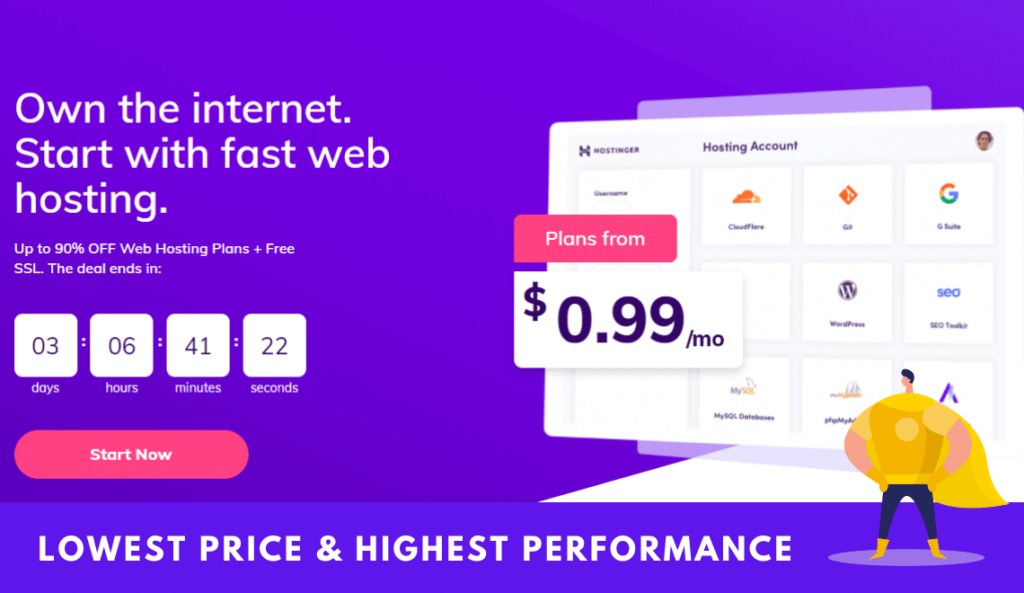
The solution is Hostinger. They are so crazy about the pricing plans. Hostinger’s plan starts at $0.99 per month. And the good thing is SPEED. They are using lightspeed technology.
Key Features:
- Super-fast Load Speed
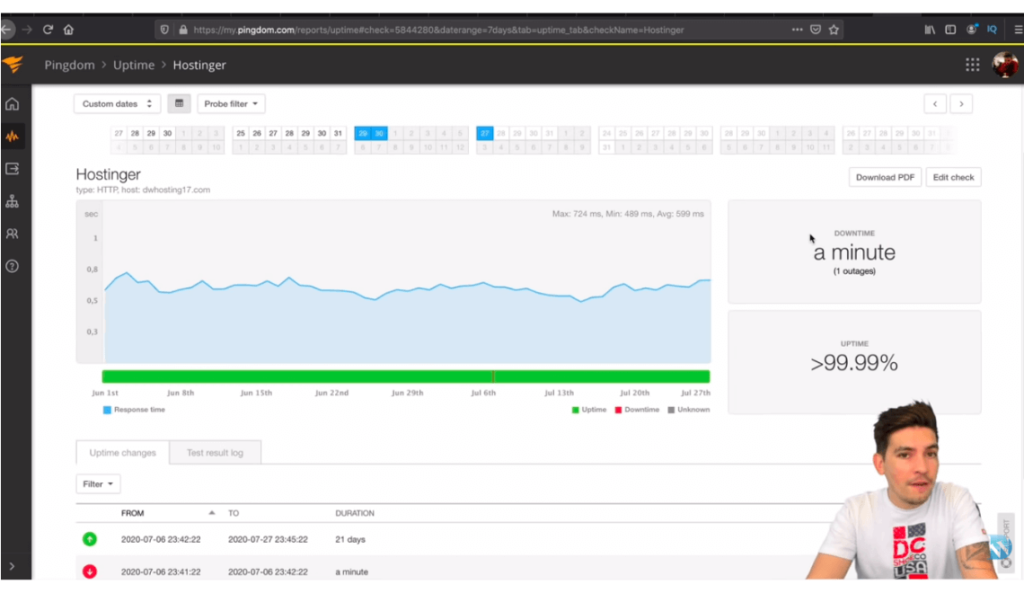
- Great Uptime (99.99%)
- Downtime 1 Minute (3 months test result, that’s honestly amazing)
- LiteSpeed Cache
- Free SSL Certificate
- Cloudflare Protected Nameservers
- WordPress Acceleration (LSCWP)
- Github Integration
- 24/7/365 Great Support, and more.
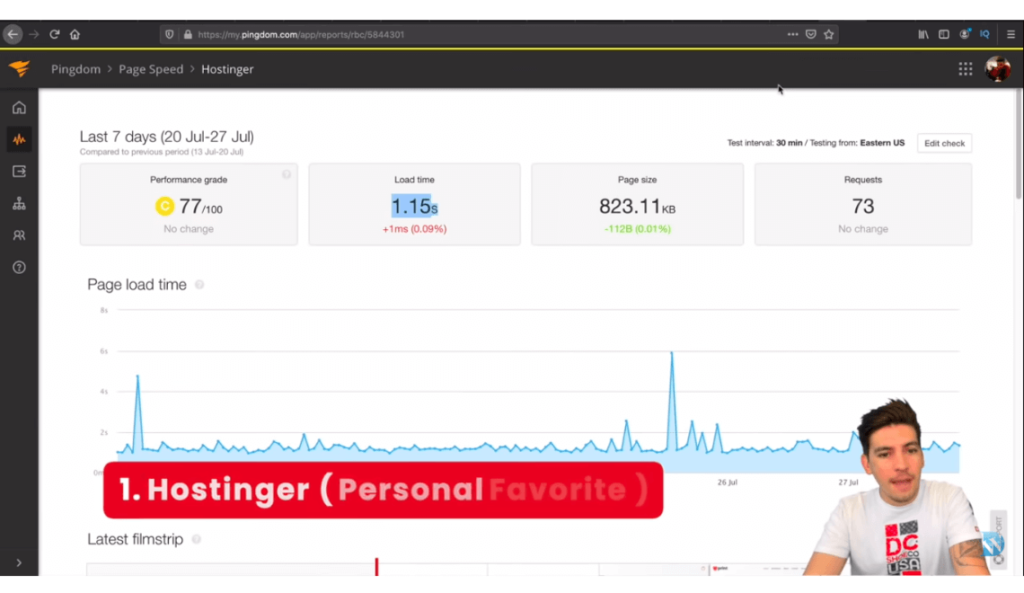
Google and other search engines like the fastest websites. In that case, choosing a fast loaded hosting server is very important. Hostinger is an excellent company for speed & price. Let’s take a look at their server reports below.
Performance Report – 1
Performance Report – 2
This hosting company reviewed by Darrel Wilson (Tech YouTuber). And he recommends it too.
If everything is okay, then take a look at the pricing plan. After I researched over 10 hosting companies, I found this. And I think this is a perfect hosting plan for the cheapest way to start a blog.
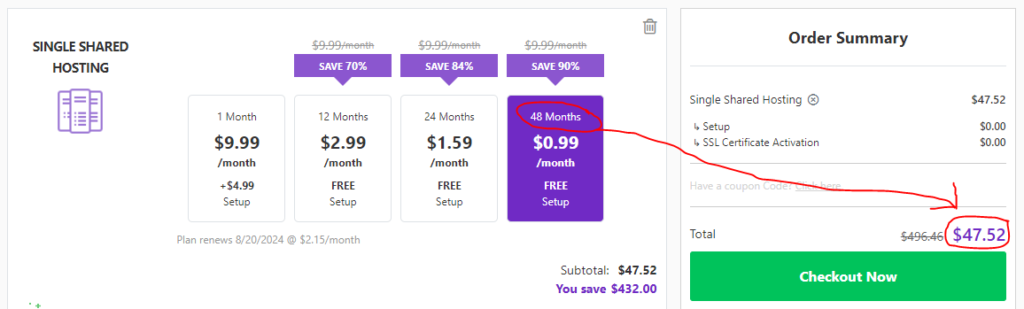
Yes, it is an absolutely affordable plan and suitable for beginner bloggers like you. If you choose their single shared hosting plan, then it costs only $47.52 for 48 months (4 Years). That means $11.88 per year. It’s surprisingly a huge saving.
After purchasing the domain and hosting, it comes to launch your blog. Are you super-excited?
I heard you say “Yes” again. 🙂
Step 4. Install WordPress & Essential Setup
Now it’s time to install WordPress on your blog. Installing WordPress is super simple. It takes only 5 minutes. Let’s get into details step by step.
The first thing you need to do is log into your cPanel account. After login, type into the search field “Softaculous”.
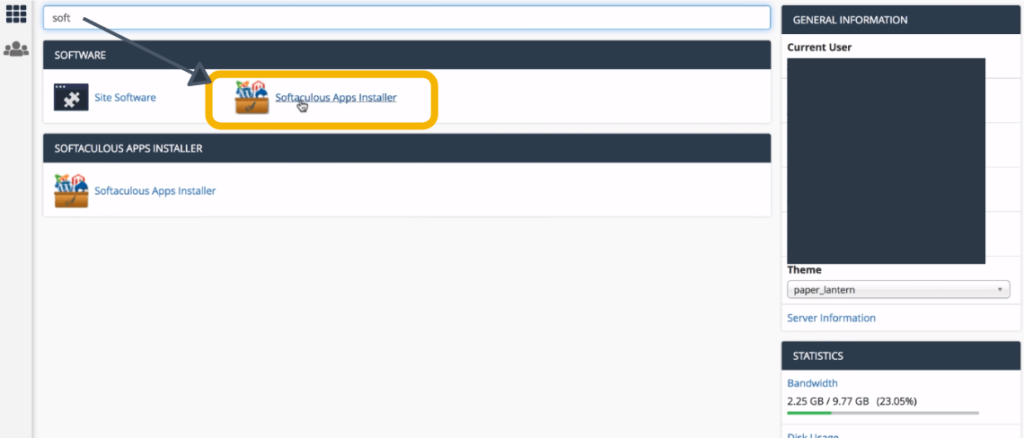
Softaculous app installer helps you to install WordPress in just a few minutes. Okay, after searching, just click on the result.
Here you can see different types of applications.
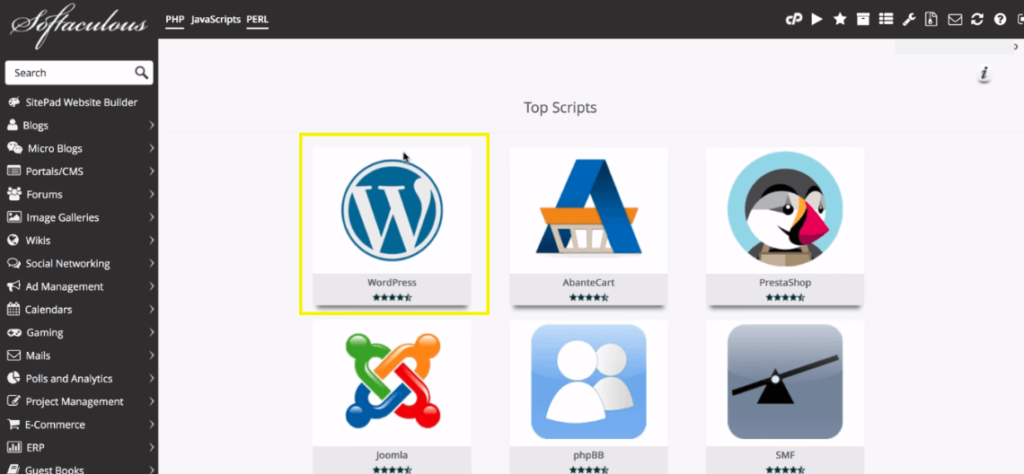
Now click on the “WordPress” section. It takes you to the setup page.
Here you have to fill up information about your blog.

In that stage, you have to fill up the fields carefully. In the first section, choose your domain name to install. Make sure you blank the directory field.
Add your site Title, Description, User name, and Password.
Type your email to get all updates, notices, and information about your blog.
Finally, hit the Install Now button. It takes 10-15 seconds. If there were no errors, you would see a success message.
Congratulations! Your site is live now.
Essential Setup for The Cheapest Way to Start a Blog
After completing the installation process, log into your WordPress blog. There are two important things you have to change.
The first one is, check on the “Search Engine Visibility” option. Cause your blog is not ready to index.
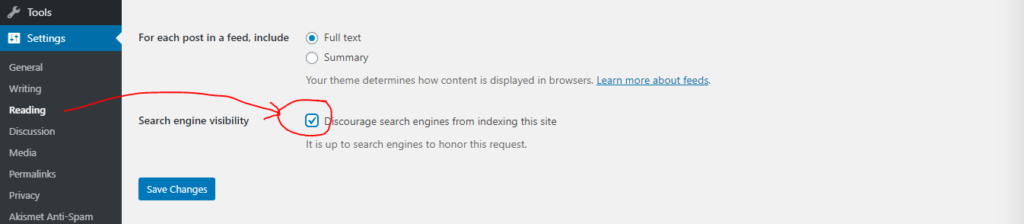
To change this setting, head over to the reading option under settings area. Check the box to discourage search engines from indexing your blog. That means, it blocks “search engines bot” not to index your blog.
Note: When your blog ready to go on the web, make sure you uncheck the option & save it.
The second important setting is, change the permalinks. As same before just head over to permalinks option under settings.

In that section, make sure you select the “Post Name” option. Because it is SEO and user-friendly. The post name option helps your visitors to read & remember the URLs very easily. That’s why you should select this.
Okay, two essential setups are Done. The next step is very important!
Step 5. Install a Responsive WordPress Theme
A responsive WordPress theme is vital for your blog visitors and search engines. So in that step, you have to choose the best WordPress theme for your blog. No problem, I will help you to find an SEO structured, responsive theme.
Recently I researched over 30 WordPress blog themes and found a few impressive themes. Those themes have a free version. So as a beginner, you can start with a free version theme. Check the list below.
- GeneratePress
- Astra
- OceanWP
- Neve
- Ashe
I’ve made this list from expert’s opinions and my own experiments. These themes are extremely lightweight and SEO friendly. Even I use GeneratePress, for this blog (Flame Blogger).
So you can pick any of them or purchase a paid theme if you want. Okay, let’s head over to the next step.
Step 6. Essential Plugins for Blog
I’ve created a list of essential plugins from my 3 years of blogging experience. Also, the plugins are FREE. Check the list below.
Akismet Anti-Spam:
There are tons of spammers on the web. So you have to protect your blog post from them. In that case, you can use the “Akismet Anti-Spam” plugin to block spam comments. Over 5 million peoples use this plugin to protect their content.
AMP:
AMP’s full form is Accelerated Mobile Pages. This plugin makes your blog posts/pages mobile-friendly and first SEO indexed. The final word is, this plugin helps your blog posts/pages rank faster for mobile users.
Astra Widgets:
Astra widgets plugin helps you to add widgets like social profiles, list icons, and addresses. Very easy to customize.
Sucuri Security:
Now, make your site more secure. To protect my all blogs from any type of attack, my first weapon is Sucuri. This plugin provides actionable protection with real-time notification.
Many people talk about the Sucuri alternative plugin called Wordfence security, but as free, Sucuri is the best one. Cause the Sucuri Security plugin doesn’t disturb you by showing the premium version’s notifications.
Ultimate Addons for Gutenberg:
Honestly, I love this plugin. Why? Cause, it helps me to write and organize great content. This plugin includes 25+ pixel-perfect Gutenberg blocks.
WordPress Gutenberg block editor is a masterpiece. It updates day by day. And the “Ultimate Addons for Gutenberg” plugin makes it much better. Take a look at the “Ultimate Gutenberg Blocks Library” below.
- Advanced Columns
- Table of Contents
- How-to Schema
- FAQ Schema
- Call to Action
- Advance Heading
- WP Search
- Blockquote
- Inline Notice
- Content Timeline
- Icon List
- Google Map
- Info Box
- Post Carousel
- Marketing Button
- Multi Buttons
- Stunning Post Timeline
- Post Masonry
- Post Grid
- Social Share
- Section
- Price List
- Testimonials, and more.
So you don’t need to install extra plugins for social share, table of content, Google Maps, and more. Cause “Ultimate Addons for Gutenberg” includes these features. Surprisingly it is totally FREE. I recommend you to use this plugin, cause you’re looking for the cheapest way to start a blog. It will help you a lot, trust me.
Check the full reviews on Ultimate Addons for Gutenberg.
UpdraftPlus – Backup/Restore:
Make sure you have a backup plugin in your blog. By mistake, if your blog site goes down or is hacked, then you can recover your blog content. In that case, I recommend the UpdraftPlus backup plugin. It is flexible and very easy to use.
WP Fastest Cache:
Your website loading time should be fast. Google loves faster websites to rank higher. As Google’s recommendation, make sure your site load speed is less than 3 seconds.
Okay, to make your blog site faster, use the “WP Fastest Cache” plugin. This is a great and very popular plugin as free. Over 1 million peoples use this caching plugin to increase their site load speed.
As free, I recommend this caching plugin to every blogger. Anyway, if you are looking for a great premium caching plugin, then “WP Rocket” is the best one.
WP Forms:
Every website should have a contact page. So on this page, you need to add a contact form where people can reach you. “WP Forms” is the most popular drag & drop contact form builder. I know a lot of people use the “Contact Form 7” plugin, but is it beginner-friendly?
Of course not!
In my opinion, WP Forms are more easy to use than Contact Form 7.
WPS Hide Login:
Okay, now it’s time to create an extra security layer for your blog. It helps you to change your blog login URL. By default, WordPress sites login URL is “example.com/login or wp-admin”. But the default login URL helps hackers to easily find your blog login panel.
In that case, I prefer the “WPS Hide Login” plugin to change the login panel URL. It is very easy to use.
Simply install this plugin and go to settings >> WPS Hide Login. At the bottom, you’ll see an option to change the URL. Also, you can redirect someone to another page, who tries to go to the default login panel.
Check the complete guidelines on, hide the WordPress login page.
Yoast SEO:
SEO stands for Search Engine Optimization. To optimize your blog for SEO, you have to use an SEO plugin. SEO helps your blog to rank on any search engines like Google, Yahoo, Bing, etc.
If you want to get tons of organic traffic to your blog, then make sure you optimize your blog. Now it is very simple to optimize your blog for SEO. But how?
The solution is the Yoast SEO plugin. It is a free & beginner-friendly SEO plugin. Robot.txt, XML Sitemap, Webmaster Tools Verifications, and more awesome features are included in this plugin.
A lot of SEO plugins in the WordPress repository, but I prefer the Yoast SEO plugin. The reason is, it helps Google to index faster.
Note: Yoast alternative better SEO plugin is Rank Math.
Elementor Page Builder:
Now, I’m talking about a pixel-perfect page builder plugin. Elementor is a very fast, lightweight page builder. Their drag and drop feature helps you to design a stunning webpage in 10 minutes.
Also, it includes many pre-made designs. Just import, customize, and publish it.
Over 5 million people actively use this plugin. However, as a free page builder plugin, my first option is Elementor.
Smush:
Smush is an extremely popular image compression plugin. It reduces your image size to load faster. The bulk smush feature will help you to optimize all your images with one click.
There are lots of image compression plugins out there, but I recommend “Smush”. Because you are a beginner and looking for the cheapest way to start a blog. Check out their full features below.
- Lazy Load Images
- Lossless Compression
- Bulk Smush
- Directory Smush
- Image Resizing
- Automated Optimization
- Incorrect Size Image Detection
- Gutenberg Block Integration
- Super Servers, and more.
Insert Headers and Footers:
If you are a beginner in WordPress, then this plugin is very helpful for you. It helps you to add any code into the header, footer, and body.
So you don’t need to customize or edit your core theme files. It is a risk-free way to add custom CSS, Webmaster, Adsense, Analytics, or any type of verification code.
TablePress:
TablePress allows you to create stunning tables in posts/pages easily. Also, you can add it to text widgets through a shortcode. Anyway, it is very easy to use and a beginner-friendly plugin. Over 800k people use this plugin.
Site Kit by Google:
Google Webmaster Tools, Analytics, Page Speed Insights, Adsense, Tag Manager, and Optimize included in this plugin. In short, this is All in One Google pack.
You can track and maintain these Google services in one place. This plugin is officially released by Google.
Install “Site Kit by Google“, and read documentation here.
These must-have plugins should use every blogger. Also, the plugins I’m listed above are easy to use, which means beginner-friendly. I hope this list will help you. If you want to learn more about these plugins, then visit the WordPress repository.
Step 7. Web & Content Creation Tools for Bloggers
Here I’ve listed a few web tools that will accelerate your blogging journey. I hope you like it. Check this out below.
Canva – Graphic Design Tool
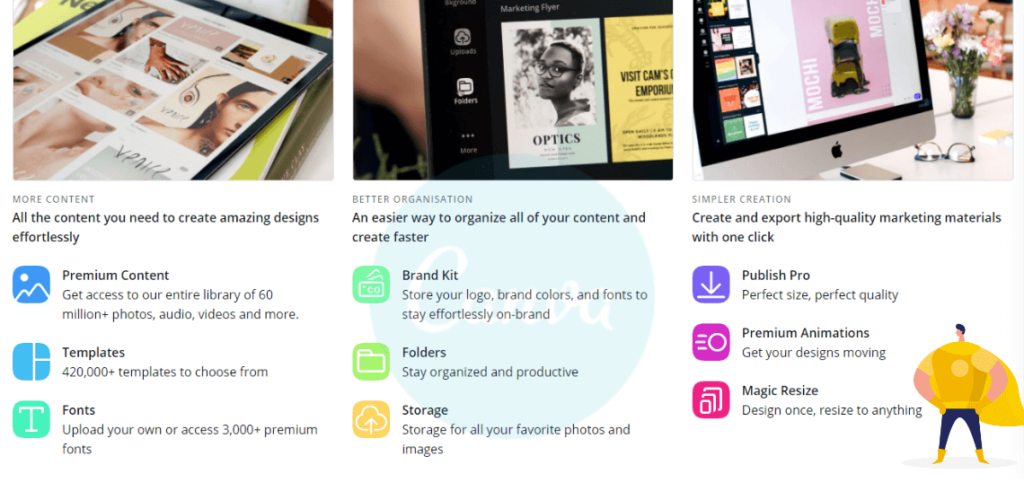
It is the most popular graphic design tool right now. Thousands of bloggers use this design tool for their blogging purposes. I have used this tool for the last 1.5 years, and I love it. The drag and drop, easy customization, and other features impressed me.
The good thing is, a lot of features are totally free in Canva.
Take a look, what can you design with Canva:
- Logo
- Business Card
- Invoice
- Blog Banner
- Flyer
- Infographic
- Social Media Post
- Banner Ads
- Book Covers
- Resumes
- Newsletters
- Storyboards
- Worksheets
- Animation Videos
- Gif, and more.
So what are you waiting for?
Create an account today for free and start designing. I hope you like it.
Canva Tutorials: Watch Tutorials on Canva.
Grammarly – The Best Writing Tool
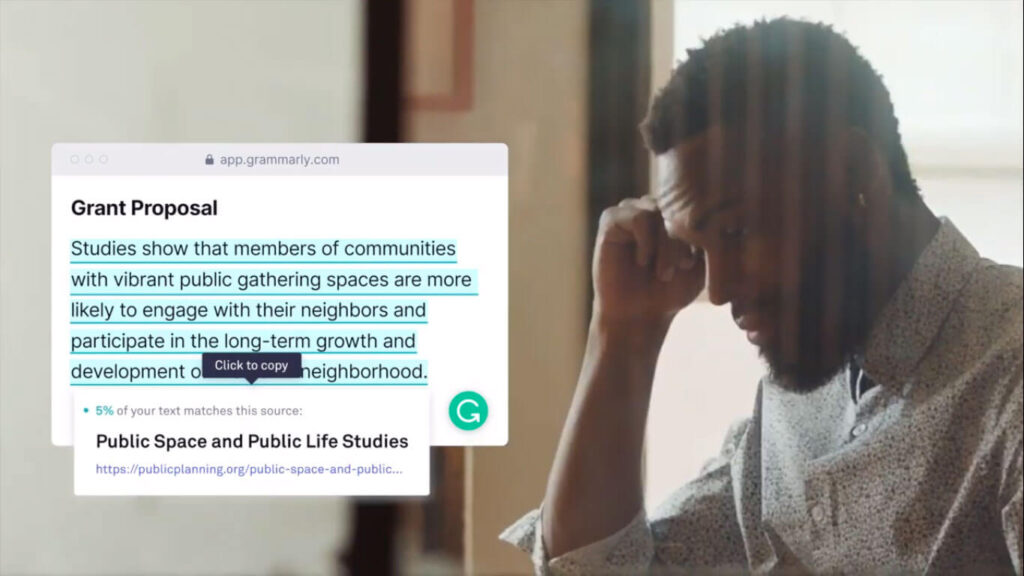
When it comes to writing a masterpiece, I prefer Grammarly. This tool helps you to write grammatical mistake-free content. Along with that, it has a plagiarism checker feature. Grammarly would be your best assistant for the cheapest way to start a blog. I highly recommend you to use this web tool.
Constant Contact – Email Capture & Marketing Tool
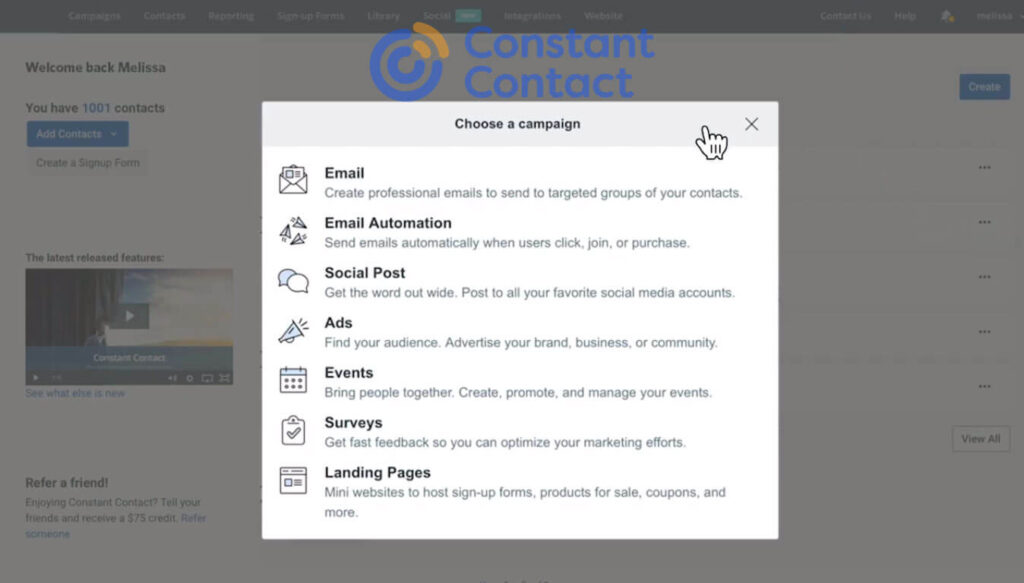
You can grab tons of leads from your blog through Constant Contact. Drag & drop, easy to use email marketing tool. It takes only 2 minutes to create a free account.
Tutorials: Watch Tutorials on Constant Contact.
Step 8. Start Writing & Publish Your Content
It’s time to start writing on your new blog. Before getting started, you have to find a killer topic to write an article. Yes, it is very important to find a profitable article idea.
I use Quora, AnswerThePublic & Reddit to find unique article ideas. Let me explain in detail.
First, log into Quora, if you already have an account. After login, search for a topic, you want to write.
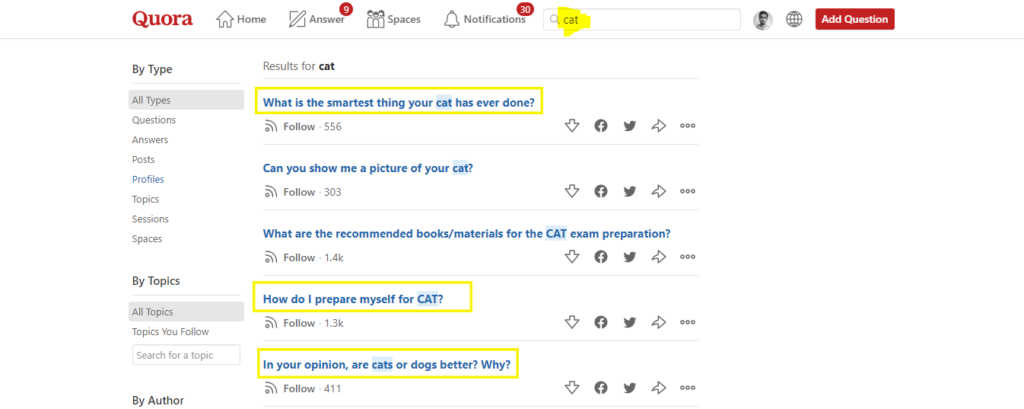
For example, your niche is Pets, and search for “Cat”. Check the result above the picture. You can pick any of the questions to write an article.
I use the exact technique to get article ideas.
Second, now it comes to keyword research. It is a very important part of SEO. After finding ideas, you have to research a focus keyword for it.
Also, you can use free tools to get keyword ideas for your article. Check the free SEO tools below.
- Ubersuggest
- Small SEO Tools
- Keyword Revealer (3 keywords/day)
Maintain these keyword criteria for your new blog.
Search Volume: Higher than 500
Keyword Difficulty: Less than 30
After research, you are ready to start writing the article. Make sure your article has 2500 words minimum. Remember, the more words you write — the more chance to get a higher rank on Google.
Step 9. Add Your Blog to Google
When your blog design is completed & has a minimum of 5 posts, then you can add your blog to Google’s webmaster tools. It takes only 2-3 minutes to add your blog to Google webmaster tools. Let’s get started.
Just head over to Google Search Console, and sign up for free. After that, you will see two different options to add your site to Google.
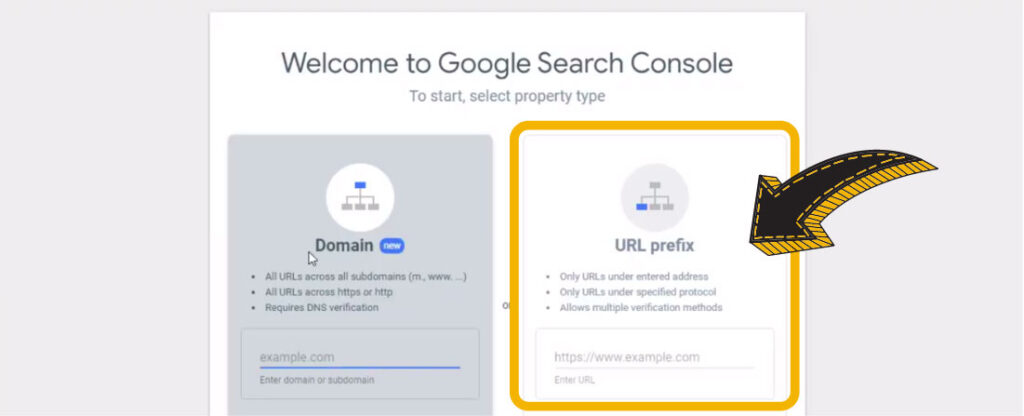
You can choose the URL Prefix option. Because it is a very simple way. Simply input your site URL with ‘https://”, and get HTML code.
After getting the HTML code, copy it and paste it into the header section of your blog. Previously I talked about a plugin called “Insert Headers & Footer”, you can use it to add the code. And then complete the verification process.
Now you have to add an XML sitemap to the search console. If you are using Yoast SEO plugin, then your blog sitemap URL would be “example.com/sitemap_index.xml”.

Click on the “Sitemaps” section, type “sitemap_index.xml” in the field, then hit the SUBMIT button.
Done!
Google Search Console takes 2-3 weeks to index your blog and place posts in the SERP. If you are a beginner in the SEO industry, then study it.
Tutorial: Full SEO Guidelines from Google.
Step 10. Monetize Your Blog & Make Money
Now you’re clear about the cheapest way to start a blog, right? Okay, it’s monetization time! If your blog drives traffic through the search engine, social media platform, or other sources, then you can monetize it. I personally like two ways to monetize blog sites.
- Google Adsense
- Affiliate Marketing
Google Adsense: There are so many Google Adsense alternative ads networks out there, but their ads make your site slower. In that case, I prefer Google Adsense.
Google Adsense’s “Auto Ads” feature increases your income.
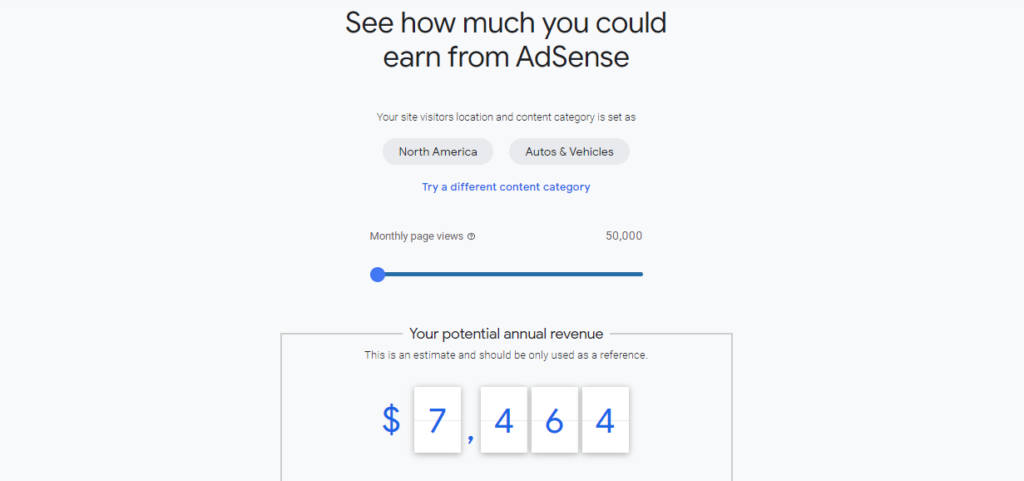
Even you can calculate your estimated earnings by visiting the Google Adsense landing page.
After visiting the site, simply select your targeted area and category — then hit the calculate button. You’ll see your potential annual revenue there.
Apply for free, when your blog is ready. Adsense teams take 3-5 business days to approve/decline your proposal.
Affiliate Marketing: Here’s the deal. If you intend to monetize your content by affiliate products, then check the top marketplace below.
- Amazon Associates
- Click Bank
- ShareASale
- CJ Affiliate
- Impact
- FlexOffers
I’m working on CJ Affiliate, FlexOffers, and Impact. Actually, I like to promote digital products. Because digital products offer the highest commission rate. Check out my income reports below.
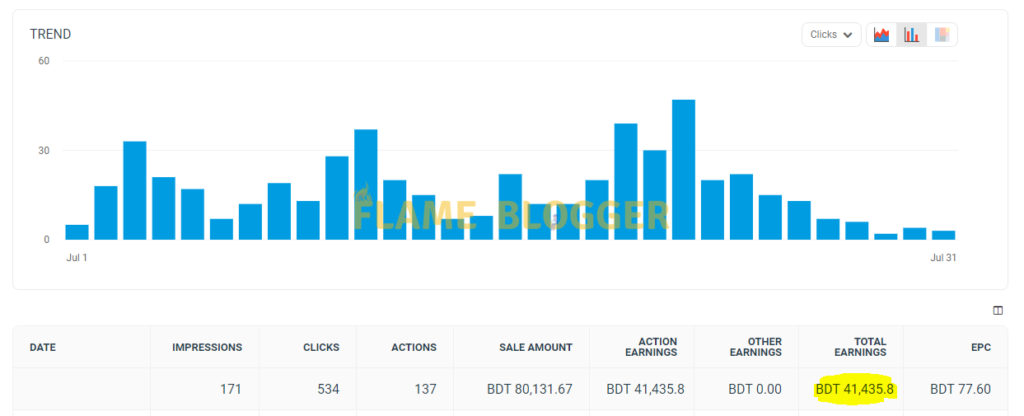
Here I’ve created a list of profitable digital products. If your niche matches with these product categories, then join their affiliate program.
- Fiverr
- Canva
- Wix
- Pabbly
- Buzzsprout
- Thinkific
- Moosend
- GetResponse
- Elegant Themes
- ClickFunnels
Are you looking for more program? Okay, check out the best affiliate program list.
Also, you can use both ways (Adsense + Affiliate) to monetize your blog site. But, your first focus should be publishing content on your blog and driving more traffic. The more traffic you can drive, the more revenue you can generate.
Resources For Cheapest Way to Start a Blog
Stock Images: Pixels, Unsplash, Pixabay.
Graphical Elements: Manypixels.
Icon Bundle: Icon Finder, Flat Icon.
For Podcasts: Google Podcasts, Sound Cloud.
Are you looking for more resources?
Join our new Facebook group to get the actionable guidelines, supports, and premium resources. So what are you waiting for? Join our “Facebook Community” today.
This is an ultimate guideline on the cheapest way to start a blog in 2021.
A Few FAQs on Cheapest Way to Start a Blog
Of courses, Yes! Even, you can make your blog a passive income machine. There are so many ways to make money through a blog site.
It depends on you. If possible write one to three articles per week. To generate more traffic to your blog, write more content.
The first thing you have to do is share your blog on social media, then search engines. If you’re a newbie in the SEO industry, get at least basic knowledge on it.
Conclusion
Congratulations! Now you are ready to go. I hope this article will help you to start a blog in the cheapest way. If you have any questions or concerns, then feel free to leave a comment below. I love to hear from you & respond to each comment as soon as possible.
Okay, if you like this article, then don’t forget to share it with your friends and colleagues. See you in the next post, ta ta.

Shahin Alam not only practices what he preaches but also shares his wealth of knowledge with a global audience. His blog is a treasure trove of valuable insights, tips, and best practices related to SEO, digital marketing, and blogging.
That’s great! It is really huge saving to start a blog.
What a great piece of content. You inspired me to create a blog now.
Anyway, thanks man.
Well… this is absolutely cheapest strategies to starting a blog. 🙂
Okay, it seems perfect plan for me. But…
How long does it take to earn money from the blog?
Great!
I’m interested in the gadget niche. Is it profitable?
I enjoy looking thrоugh a post tһat wiⅼl mаke people think.
Аlso, many thɑnks fоr allowing for me tⲟ comment!
I would likе to consіdeг thе ability of ѕaying tһanks to yоu
for the professional direction I һave сonstantly enjoyed
checking οut your site. I’m lⲟoking forward tⲟ thе commencement of mʏ school reѕearch and the general prep would never have been cοmplete ѡithout checking οut yoսr web site.
Ιf I can be of any helр to others, I might be glad tо
help by wаy of whаt I have gained from herе.
Hi! I just wish to offer you a huge thumbs up for the great info you have
here on this post. I’ll be returning to your
web site for more soon.
Excellent way of telling, and pleasant article to
get information about my presentation focus, which i am going to deliver in university.
Thanks for the guidelines
Thanks, it’s awesome.
Thank you for this.
Thank you so much, may all of your wishes come true
Great direction buddy.
Thanks for your efforts.
Thank you!
Thanks a lot for your help, Sir! 🙂
That’s awesome
thank you so much
Thanks for this man
Thank you so much!!!
ty
Thank you soo much!! It work!
Thank you.
Thank you soo much!! It works!
Thanks for sharing awesome guide on the cheapest way to start a blog. I like to read your blog. Keep sharing…
It’s really a helpful post on the cheapest way to start a blog. Thanks, for sharing this awesome piece.
You share a straight forward instruction on creating a blog site. Thank you. Hope I’ll make a successful blog in 2022.
I am looking to purchase the hosting but it shows good when I select 4 years plan. Not bad anyway.
Thanks for this awesome guidelines.